
DIY GoPro Swivel Helmet Mount [Improved]
REVIEW OVERVIEW
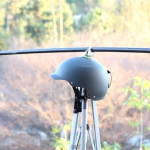
We went back to the drawing board and slightly tweaked the design of the last DIY GoPro swivel mount we posted. Now you can enjoy the peace of mind that comes from not having four pointy screws aimed at your skull. Enjoy.
What you’ll need to make the DIY GoPro swivel helmet mount:
- One 2″ swivel caster w/threaded post from Ebay ≈ $6
- 5/8″ washers and nut
- 5′ of 1/2″ or 3/4″ PVC pipe
- PVC end cap
- PVC cement
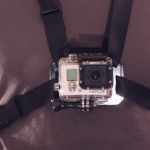
- GoPro seat post mount from Ebay ≈ $19 (This will come in handy for other projects)
- One 4in 1/2″ hex bolt
- Two 1/2″ nuts
- Forty 1/2″ fender washers
Tools you’ll need:
- Power drill
- Drill bit set
- Hack saw or PVC cutter
- wrenches
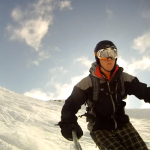
DIYGoPro Sample Video:
Feast your eyes on our tasty test footage.
ABOUT THE AUTHOR


Sweet thanks for the improvement, I like only drilling one hole rather than 4!
That’s what we were thinkin’
The shots taken with the gopro swivel helmet are sick! I’m kinda curious to know how it would look in normal speed playback, but in slowmo it looks really sick! It looks easy to make and it does a good job, I’m giving it a go then.
I’m thinking of doing a high speed downhill shoot with the swivel helmet and I’d love to see how stable I can get it to shoot in a steep angle. I believe it will work pretty well, but I may need to make few tweaks to make the movements perhaps a bit stiffer. I’m not sure, we’ll see, but great design guys.
All part look cheap enough, so the whole project budget should not exceed 50 bucks I don’t think. Cheap price are important on these DIY projects, because sometimes you mess up the build and at times the designs may be less than perfect. To be fair the gopro swivel looks well designed, but I never give too much props until I try the design in the real world. Let’s hope that it earns a 5 star rating from me.
Great design! Gonna use it:) I might cut the caster wheel off by hacksawing through the axil (easier methinks than drilling it off) and I’m gonna put the bolt that holds the fender washers perpendicular to the pvc pipe by drilling through the back end of the pipe thus eliminating the need for a cap, glue and making the end of the bolt inaccessible. Now if I can just DIY the post mount, I can make this thing for free by rummaging through my shed…Thanks guys!
Thanks, Marty! We thought about cutting through the axle, but drilling it out was quick and a lot less work considering we could use a power drill. A perpendicular design with the washers would be nice. We went with our design to keep everything perfectly balanced in all directions, but your idea will definitely function nicely. As for a DIY GoPro post mount, there’s got to be a way to use a hose clamp for that. We’ve just got so much use out our official GoPro mount that it’s one of those things we think is just worth buying. Send us a link to a video once you get everything built!
I started off using this video and made a helmet mount. After looking at the finished product I felt there were a few variables that I couldn’t control that I would like to control.
The first thing I did was drilled a hole a 1/2″ past the pivot point towards the front. The vertical hole takes a bolt with a nut on each side of the pipe. Moving the nuts allows me adjust the height of the pole and steady the movement.
Controlling the up down movement allowed me to shorten the back pole. I was able to cut almost the entire length of the rear pole off. I left the weights on the back to help balance the weight of the camera, but no longer need the length of the rear pole to balance the camera.
I then purchased u-bolt that is the same size as the caster. By torquing the u-bolt down I can stop the unit from swiveling. That allows me to pick a shot and hold it.
How to use this while wakeboarding? Is it “safe” enough? Considering it would sink if it fell off…
It would probably sink the way it’s designed here, but nothing is stopping you from attaching a floatation device to the rig. Actually, we dare you to. Then send us a link you your tutorial video!
Exactly what is the length of the pvc tube?
Hey Jake—it’s really up to you. Ours was about 5 feet long. Our suggestion would be to use a piece that is pretty long and position your GoPro at different distances to see what you like. Then, trim the PVC to your liking. Or, replace the PVC you see here with an adjustable pole mount, like a Swiffer handle or something. Good luck—cheers!
What about those of us that wish to attach this set-up to a motorcycle helmet???
Can’t drill a hole through a Motorcycle helmet
Thanks a tough one, Mike. It really doesn’t feel like the safest thing to wear. Plus, it would get blown around pretty good at higher speeds. Let us know if you have anything suggestions. Does anyone here have any ideas?
I doubt it would be blown about that much. I have seen a professinal made version used on a sports bike on a race track. Below is link to that vid. SO it can be done. Would have to use the helmet sticker attachment you get with your GoPro, i just can’t figure out how to then attach that to the swivel castor.
http://youtu.be/cqolouFWLl0
I think some fins or a cone around the washers would keep it stable, I notice this rig focuses on his face so its probable that it has this kind of system or is slightly sprung to a point
This is a great web site. I do not have a GoPro yet but already have ideas as to how I want to use one. After I get one I will try and modify your design so I can mount it to my boat. Possibly to the top of my center console’s grab rail on in one of the rod holders. In researching GoPro cameras I came across your website and another product called “sugru’
I can imagine all kinds of compatible uses for this product and GoPro cameras! It might even work to secure mounts to helmets.
Thanks for the great do it yourself tips!
Happy trails, cowboy Mike
I like the idea of NOT drilling into an expensive motorcycle helmet, but the duct tape looks pretty sketchy. Has anyone tried industrial, self adhesive velcro tape? If you put a strip of that down the center of the helmet from front to rear, you could then adjust the position of the castor along the center line of the helmet and open up even more camera angles.
well I am going to do this with a snowboard helmet and i didn’t like the idea of a screw sticking towards my head =P so i have decided to use a bit of wood, cut to the shape of my helmet, spray paint it black and glue it on to the helmet using contact adhesive. Then I will either: A) put the threaded post into the block of wood or B) do away with the threaded bar and just glue the bottom of the castor to the wood will probably do A)
If it works I can send a video however I don’t know who to send it to =/
Sam
I literally just made this on a motorcycle helmet. I know the comment is old but i imagine someone will see it. seems pretty heavy but i drilled a hole in one of the gopro plastic extensions and put the caster wheel thru it.
I made this rig in a few hours and made a few (in my opinion) improvements!
1.) I used a step drill bit to make the inside part of the hole on the helmet. Drill with the step bit until the hole is just big enough for the nut. The bit probably won’t get all the way through so use the bit mentioned in the video for the rest. This gives the hole an inverted funnel cross section which allows the nut on the inside on the helmet to be flush. I used a close-fitting BMX helmet so this was a necessity. One last benefit is that to make the nut flush it has to be pressed in which gouges the material to its shape and therefore a better fit.
2.) If you don’t have PVC cement and primer (or just don’t want to wait for it to cure) just put a screw into the PVC cap and arm. This will also let you get to the bolt if need be.
3.) This one is really just a tip but who’s counting? Keep the nut on the swivel’s stem before cutting it. Unscrewing it after the cut will fix the threads.
4.) This last one is an idea I’ve been kicking around; after reviewing my first bit of footage I noticed that the camera has free vertical and horizontal movement but since it is still fixed to the arm the camera was forced to tilt when I tilted my head. To fix this I am thinking of placing a bearing between the arm and bike/rollbar mount. Here is a link to one I would use http://www.vxb.com/page/bearings/PROD/Kit7485 . I can’t remember the exact outer diameter of the 1/2″ pipe I used (no, it isn’t 1/2″) but either this one or the 1″ inner diameter one should work. The trick now would be to keep the inside ring static, the outside ring free, and the entire thing from sliding on the arm, To keep the inside ring in place I’d think wrapping a few layers of tape around the part of the arm where the bearing will be placed would be sufficient. Adding a few more layers on both sides of the bearing would keep it from sliding.
Good thinking Phillip! Send us a video to your new design if you end up doing it—cheers!
Hey,
Thanks for the good mount! One thing your missing on your parts list is the bolt that gowes through the pvc on the swivel. What length, etc.
Thanks,
Matt
Hey Guys.
Great idea – I’m just going out to buy the kit to make this.
Has anyone sent you links to their videos using this kit?
If so, where are they? I’d love to see them!
Mike
Love the site. Built one the other day based on this. I put the bolt perpendicular to the pvc vertically (not side to side) to keep it centered and accessible.
http://youtu.be/4X1la-5uW1U
I like the Idea more than the implementation.
I do not like how you are drilling holed in PPE, which wrongly makes people assume this is safe.
It will greatly reduce the strength of the helmet, so any action sports with this is just silly.
But for anything other than where you would actually need your PPE (so no sports really,) its good.
Using a wakeboard helmet you don’t have to drill a hole -there’s one right in the middel! I’m going to build this today – using a “pool noodle” on counter side to assist with floatation. I’ll send a pic
Great vid, defiantly going to try this out, maybe with a few improvements so you don’t have to drill through the helmet. Also have you any ideas on how to fix it in a solid position or to dampen the spinning, (i.e slow it down)
Hey Doug—it really doesn’t spin too fast, in fact we wish it spun a little faster! But not sure what you’re looking to do, so your call. If you figure out a solution to drilling a hole in the helmet we’d love to see it—good luck!
Hey, I’ve just finished making this without having to drill into the helmet. Pics/Vid will be posted in a few days when I get the chance to. Going to be tested at the start of march.
So cool, i like it
Hey guys I just made one of my own, and I wasn’t a fan of drilling holes into my helmet. Instead, i’m using industrial strength velcro, it has good holding power, there’s no screw going into my head, and its very easy to strap on to different helmets, just stick a patch of hook to each helmet. I also decided to use 3/4″ PVC cut in 12″ pieces with male and female ends on each side so when i’m done using it I can break it down and toss it in the bag… Thanks for the intial seed planting, this is going to be a lot of fun to use!
Great DIY! Way better than spending 120$ on one!
However the only problem as I ride motocross is the not wanting to drill into the helmet!
All in all the design seems great for slow motion into turns and jumps and stuff!
I am going to use your design of the swivel however I’m thinking about finding a way to make a mount utilize the quick release gopro clamps and the swivel caster wheel!
I’ll let you know if I find anything as this has been a common question.
Just need to scrounge up some $ and order a couple parts and make a Home Depot run
Looks awesome!, cant wait to make one.
I really like this idea. I haven’t done this, but I might try to create a mount using a rare earth magnet. Epoxy a metal washer inside the helmet, then attach a rare earth magnet to the swivel. Unless you are doing something really extreme, I think the magnet should hold things in place. The benefit of this is two fold, first the mount would be easily removable without a swivel on the top of the helmet, second it would be safer in the event of a fall. If I ever make it I’ll post the result.
thanks again for the cool idea.
Has anyone done this with a Sony Action Cam?
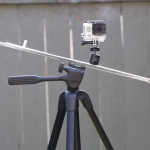
awesome. i used a tripod mount and a 1/4″ bolt instead of the handlebar mount. it was lighter so i saved money on washers to balance it!
I am starting thi build but I am making a mod, making the swivel mount removable with go pro mounts.
Will be making a video of the mod if it works well.
here is the finish product of my mod of the improved swivel mount.
https://www.youtube.com/watch?v=lcQV2TVh5nc
feel free to ask me questions or comment.
Would have been nice to see regular speed video at some point in this video. All slow motion. Looked good but couldn’t tell much. Most vids have some slow motion mixed in, but not for the whole duration of the clip.
I’m definitely going to be making one of these for myself. But I’ve managed to find an alternative castor which I think will be an improvement, anyone else thinking of building one might want to check it out:
http://www.amazon.co.uk/50mm-Bolt-Swivel-Castor-capacity/dp/B00O8SKQH2/ref=sr_1_23?s=diy&ie=UTF8&qid=1420990602&sr=1-23&keywords=hole+fitting+castor+wheel
I figure using that with a countersunk m10 bolt coming out from inside the helmet means there’s less metal sticking down towards my head if something were to go wrong. Also as a bunch of others have said, you can easily get a helmet with a hole pre cut out of the top. Keep it simple
Just fall on your head hard enough and that nut will crack your scull right open! I wouldn’t put that screw though the helmet. Better strap it with a helment mount or use 3m tape and safety wire.